Not all information is visible. Please log in or register to see more.
Hello there!
More great content is available for our registered community members, log in now to take a look.
Log in
Log in using your Iress Community username and password. Your username will be shown to you in your activation email.
Log in to Community
OR
Sign up
If you are navigating here straight from our software,
click to Register. If not, find out how to register here
Create New Account
Turn on suggestions
Auto-suggest helps you quickly narrow down your search results by suggesting possible matches as you type.
Xplan Integrations
Details of all the companies who integrate with us
Turn on suggestions
Auto-suggest helps you quickly narrow down your search results by suggesting possible matches as you type.
- Iress Community
- :
- Iress Community Knowledge Base
- :
- Iress Open Knowledge Base
- :
- Xplan Integrations
- :
- For Integrators / Developers: Xplan API OAuth 2.0
Options
- Bookmark
- Subscribe
- Printer Friendly Page
- Report Inappropriate Content
For Integrators / Developers: Xplan API OAuth 2.0
on
12-07-2019
10:37 AM
- last edited on
22-05-2025
11:17 PM
by
![]() jim.farrell
jim.farrell
- Xplan OAuth Flow
- Step 1: Authorisation
- Step 2: Getting the Access Token
- Step 3: Access Protected Resource using Access Token
- Step 4: Refresh Token
- Access User Information
- HTML Examples
- HTML Form for Testing Step 1: Authorisation
- HTML Form for Testing Step 2: Getting the Access Token
- HTML Form for Testing Step 4: Refresh Token
- Errors
The OAuth 2.0 grant flow is a protocol that lets your app request authorisation to private details in a user's Xplan account without getting their password.
You need to register your app with Iress before getting started. A registered app is assigned a unique App ID and Secret which will be used in the OAuth flow. The Secret should not be shared.
To register your App, please speak to your Iress contact.
Xplan OAuth Flow
For the benefit of the example we will step though here:
- the App Name is 'MY TEST APP'
- the App Id (someteimes referred to as an API key) is 'my_app_id'
This flow illustrates the Iress recommended method to connect your App to Xplan and is appropriate before both the Iress Open Standard integration pattern, and a connection directly to the resourceful API via a custom App Key. To understand more about collecting you App or API key please refer to this article.
Step 1: Authorisation
Your web or mobile app should redirect users to the authorisation URI:
my_xplan_site/oauth2/auth
The following values should be passed as path parameters:
- "client_id" - App ID issued to you by Iress
- "response_type" - Use value "code"
- "redirect_uri" - URL to redirect back to
Here is an example:
my_xplan_site/oauth2/auth?client_id=my_app_id&response_type=code&redirect_uri=my_redirect_uri
If the user is not authenticated, the user will be challenged with the Xplan Login page.
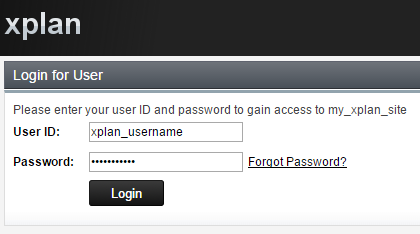
Once the user is successfully authenticated with Xplan, the following page will display:

My Test App is the app name you registered with us.
If the user clicks No, your app will not be authorised to access user resource and the user will be retained at the Xplan site.
If the user authorises your app by clicking Yes, Xplan will redirect the user to your specified "redirect_uri" with a temporary code in a "code" path parameter:
my_redirect_uri?code=js2qqmr6RTES9T7BfwFVJKflN2DyVfxnCzzBJq2l
The temporary code is called an authorisation code. Exchange this code for an access token in Step 2.
|
Important note: An authorisation code can only be exchanged once for an access token. If the authorisation code is exchanged more than once, the Xplan server will respond with a status of HTTP 400 Bad Request and an invalid_grant error. |
Step 2: Getting the Access Token
You need to use the authorisation code from STEP 1 to exchange for an access token.
The token URI is:
my_xplan_site/oauth2/token
The following values should be passed as HTML form data using POST method:
- "client_id" - App ID issued when you created your app
- "client_secret" - Issued when you created your app
- "redirect_uri" - URL to redirect back to
- "grant_type" - Use value "authorization_code"
- "code" - A temporary authorisation code received from Step 1 Authorisation
Below is an example in curl:
curl      --request POST ^
     --url
 ^
     --header "Content-Type: application/x-www-form-urlencoded" ^
     --data "client_id=my_app_id&client_secret=my_app_secret&redirect_uri=my_redirect_uri&grant_type=authorization_code&code=js2qqmr6RTES9T7BfwFVJKflN2DyVfxnCzzBJq2l" ^
     --include
A successful response looks like below:
{
    "access_token": "aq0k0TPcQykKfxzCAIcIAC7Pk1GY1D5MlrpjG0AB",
    "token_type": "Bearer",
    "expires_in": 3600,
    "refresh_token": "XPjyW0aylTgKGtV157nvpljTfEsZuZYkSlU2RjVE"
}
In the response above, you will find a valid access token that expires in 60 minutes, and a refresh token that can be used to exchange for a new access token and a new refresh token.
|
Important note: Only an access token can be used for accessing user resources. A refresh token cannot be used for accessing Xplan user resources. |
An authorisation code can only be exchanged once for an access token. If the authorisation code is exchanged more than once, the Xplan server will response with HTTP 400 Bad Request and an error message below:
{
    error: "invalid_grant"
}
Step 3: Access Protected Resource using Access Token
In order to access the Xplan API using the OAuth access token, you need to add Authorization HTTP Header to your Xplan API request:
Authorization: bearer my_access_token
Below is an HTTP POST example to create a document using bearer token:
curl      --request POST ^
     --url "my_xplan_site/resourceful/docnote-v2" ^
     --header "Authorization: bearer aq0k0TPcQykKfxzCAIcIAC7Pk1GY1D5MlrpjG0AB" ^
     --header "Content-Type: application/json" ^
     --data "{\"subject\": \"this_is_a_test\",\"entity_ids\": [9, 10],\"mimetype\": \"text/html\", \"body\": {\"_type\": \"Binary\",\"_val\": \"PHA+ZmlsZXBhdGgvMDAxLm1wMzwvcD4=\"}}" ^
     --include
You will receive cookies in the response.
In future requests it is important that you should return the cookies associated with the bearer token. This will maximise performance as Xplan uses 'sticky sessions' / 'Session affinity'.
|
Important note: You should send the aligned bearer token and the cookies as a set in future requestes to avoid confusion over the security context of the request. |
For example is an application returned Mary's session cookies with Julia's bearer token it would be unclear as to which user context should be honoured for access rules.
Step 4: Refresh Token
When an access token is expired or becomes invalid, you can use a refresh token to get a new access token. You can also use refresh token to get multiple access tokens.
|
Important note: A refresh token can be used only once. Once a refresh token has been used it becomes invalid and a new refresh token will be required. Every time a access token is issued a new refresh token is also issued. |
The token URI is:
my_xplan_site/oauth2/token
The following values should be passed as HTML form data using POST method:
- "client_id" - App ID issued when you created your app
- "client_secret" - Issued when you created your app
- "redirect_uri" - URL to redirect back to
- "grant_type" - Use value "refresh_token"
- "refresh_token" - The refresh token
Below is an example in curl:
curl --request POST ^
--url "my_xplan_site/oauth2/token" ^
--header "Content-Type: application/x-www-form-urlencoded" ^
--data "client_id=my_app_id&client_secret=my_app_secret&redirect_uri=my_redirect_uri&grant_type=refresh_token&refresh_token=XPjyW0aylTgKGtV157nvpljTfEsZuZYkSlU2RjVE" ^
--include
A successful response looks like below:
{
    "access_token": "lYNC18rjy068HlEvJq9O6MPV4h1qizqjgZbUqnx7",
    "token_type": "Bearer",
    "expires_in": 3600,
    "refresh_token": "tDICH5JtA4sg5Uv0fb28TR6y3f3Dz6ql3Rwv6fPn"
}
In the response above, a new access token and a replacement of the refresh token are issued.
Access User Information
You may need to find out which user has just granted permissions to your App via OAuth workflow. The example request below, for interactions via a custom key directly with eth Xplan resourceful API will return the user's ID.
Method:
GET my_xplan_site/resourceful/session/user
Sample Response:
{
    "locale": "AU",
    "entity_id": 2582,
    "role_name": "User",
    "last_login": {
        "_val": "2016-11-01T12:57:08.983333",
        "_type": "Date"
    }
}
Then you can get user(entity_id: 2582)'s information via the entity endpoint below:
my_xplan_site/resourceful/entity/user-v2/2582
HTML Examples
You can find some example HTML code here for testing OAuth interactions with Xplan API.
HTML Form for Testing Step 1: Authorisation
The HTML form below can be used for testing STEP 1: Authorisation:
<html>
<head>
</head>
<body>
    <form action="my_xplan_site/oauth2/auth" method="GET">
        <p>
            client_id: <input name="client_id" value="my_app_id" />
        </p>
        <p>
            response_type: <input name="response_type" value="code" />
        </p>
        <p>
            <input name="redirect_uri" value="my_redirect_uri" />
        </p>
        <button type="submit">Submit</button>
    </form>
</body>
</html>
Replace placeholders my_xplan_site, my_app_id, and my_redirect_uri with proper values. Save the code to a file named "STEP 1 Authorisation.html".
View the HTML in a browser, make sure the values are entered correctly and click Submit button.
HTML Form for Testing Step 2: Getting the Access Token
Besides the curl command, you can also use HTML form to test STEP 2: Getting the Access Token:
<html>
<head>
</head>
<body>
    <form action="my_xplan_site/oauth2/token" method="POST">
        <p>
            client_id: <input name="client_id" value="my_app_id" />
        </p>
        <p>
            client_secret: <input name="client_secret" value="my_app_secret" />
        </p>
        <p>
            redirect_uri: <input name="redirect_uri" value="my_redirect_uri" />
        </p>
        <p>
            grant_type: <input name="grant_type" value="authorization_code" />
        </p>
        <p>
            code: <input name="code" value="my_authorisation_code" />
        </p>
        <button type="submit">Submit</button>
    </form>
</body>
</html>
Replace the placeholders of - my_xplan_site, my_app_id, my_app_secret, my_redirect_uri and my_authorisation_code - with proper values. Save the code to a file named "STEP 2 Access Token.html".
View the HTML in a browser, make sure the values are entered correctly and click the Submit button.
HTML Form for Testing Step 4: Refresh Token
Besides the curl command, you can also use HTML form to test Step 4: Refresh Token:
<html>
<head>
</head>
<body>
    <form action="my_xplan_site/oauth2/token" method="POST">
        <p>
            client_id: <input name="client_id" value="my_app_id" />
        </p>
        <p>
            client_secret: <input name="client_secret" value="my_app_secret" />
        </p>
        <p>
            redirect_uri: <input name="redirect_uri" value="my_redirect_uri" />
        </p>
        <p>
            grant_type: <input name="grant_type" value="refresh_token" />
        </p>
        <p>
            code: <input name="refresh_token" value="my_refresh_token" />
        </p>
        <button type="submit">Submit</button>
    </form>
</body>
</html>
Replace the placeholders of - my_xplan_site, my_app_id, my_app_secret, my_redirect_uri and my_refresh_token - with proper values. Save the code to a file named "STEP 4 Refresh Token.html".
View the HTML in a browser, make sure the values are entered correctly and click the Submit button.
Errors
Possible errors from the POST /oauth2/token
|
invalid_request |
The redirect URL passed in doesn't match the redirect URL stored in the API Key Portal. - Simple errors like preceding or following spaces in the URL textbox in the API Key Portal can cause this. While the URL passed in must start with the URL stored in the API Key Portal, they do not have to be 100% identical. Not all of the required parameters ['grant_type', 'client_id', 'client_secret'] were passed in. |
|
invalid_client |
The client_id or client_secret passed in is not the same as that stored in the API Key Portal. Note that it can take 1 hour for an Xplan site to refresh with the latest data in the API Key Portal. So if a secret is re-generated in the Portal it will not be available in the Xplan site immediately. |
|
invalid_grant |
The refresh token passed is not correct. |
|
unsupported_grant_type |
the grant_type passed in was not authorization_code |
|
server_error |
An unexpected error occurred |
1
Kudo

Iress is a technology company providing software to the financial services industry.
Our software is used by more than 9,000 businesses and 500,000 users globally.
Trust
© Iress 2025. All rights reserved