Hello there!
More great content is available for our registered community members, log in now to take a look.- Iress Community
- :
- Iress Community Knowledge Base
- :
- Iress Open Knowledge Base
- :
- Xplan Integrations
- :
- How do I activate a standard Xplan integration?
- Bookmark
- Subscribe
- Printer Friendly Page
- Report Inappropriate Content
How do I activate a standard Xplan integration?
30-11-2019 02:56 AM - edited 11-03-2023 01:16 AM
- Who can activate integrations?
- How is activation done?
- What is happening in the background?
- How do I deactivate an integration?
- How do users access the integration?
- Is any setup needed on the integrator's software?
- How can I discover what an integrator’s software does?
- Why can't I see the integration I am looking for?
Who can activate integrations?
If you have your own site this can be done by your system administrator or a user with the System Settings capability.
Managed Services Customers on multi-tenanted sites should contact their Account Manager
All Xplan sites upgraded to the December 2019 major release (19.12.98) will have the System Settings page described below enabled.
Important note: site administrators should check that their business processes and procedures allow them to enable integrations on behalf of their firm.
How is activation done?
1. Click on the cog icon to the left of your screen. Click on the Site menu option and then System Settings.
2. Click on the Iress Open menu option, the screen below will appear. Each tile represents an integration.
3. If there is a green tick in the top right corner, the integration has been activated.
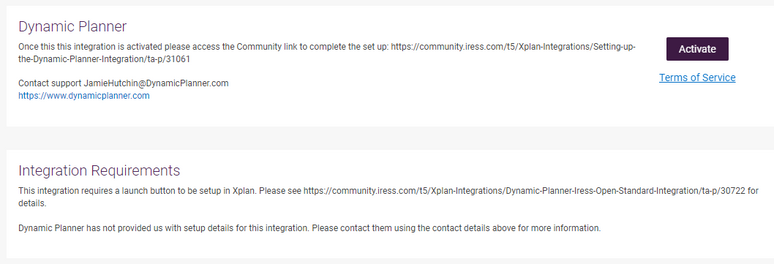
4. To activate an integration click on its tile, the screen below will appear. Each tile provides a short description of the software, a contact email address and the website link. If there are any special steps to accommodate setup in Xplan, those will be shown under Integration Requirements.
5. Click on the Terms of Service link to preview Iress’ terms and conditions. Note: not all integrations require agreement to our terms, so you may not always see this link or be asked to agree to our terms upon activation.
6. The capabilities that users of the integration are likely to need are also listed to the right of the screen for information.
7. When you click on the Activate button Iress’ terms and conditions will appear. Click on Agree to proceed. Click on Close to cancel.
Important note: If, as a site administrator, you do not have the authority to agree to the terms and conditions on behalf of your firm then you should seek authorisation from within your own business structure before proceeding.
8. To return to the integration tiles screen click on Iress Open at the top of the screen.
What is happening in the background?
When you activate an integration a link is created between the integrator’s software and your Xplan instance using Application Programming Interface (API). This allows data to be exported from Xplan into the integrator’s software to avoid the need for dual keying and reduce human error.
How do I deactivate an integration?
1. Click on the tile for the activated integration and click on the Deactivate button.
2. The button will now read Activate. Click on the Iress Open heading to return. The green tick will now be removed.
How do users access the integration?
1. In most cases you will access the integration via the provider’s (integrator) software. Contact details can be found in the integration tile (please see point 5 above). If an integration is accessed in another way details will be provided in the Community under Available Integrations
2. You will also need to ensure that users have the capabilities listed against the integration tile. Please see point 7 above.
Is any setup needed on the integrator's software?
This varies between different integrators. If the integrator has provided a link to their setup instructions this can be found on the Community. Otherwise please contact the integrator using the contact details provided.
How can I discover what an integrator’s software does?
There is a link to each integrator’s website in the integration tiles. Please see point 5 above.
Recommend that before enabling the integration links between your Xplan site and a Third Party you ensure that you are confident that the integration solution satisfies your business needs. Although Iress are facilitating a two way integration with a variety of capabilities and data points it does not necessarily mean that the Third Party software is facilitating exactly the same.
Why can't I see the integration I am looking for?
An integration will only be visible on the system setting screen if it is; (1) A standard integration as opposed to a bespoke or custom version, (2) It has been published via an internal Iress process which requires that certain conditions are met including provision of data from the Integrator. Available integrations, their type and status are listed in the Community.
Iress is a technology company providing software to the financial services industry.
Our software is used by more than 9,000 businesses and 500,000 users globally.


